Master the Propagation Process: How To Propagate Alocasia Perfectly – Alocasia, with their striking foliage, are a popular choice for plant enthusiasts. But what if you could grow even more of these captivating plants? Propagation allows you to expand your collection and share the beauty of Alocasia with others.
This guide will equip you with the knowledge and techniques to successfully propagate Alocasia using various methods, from division to cuttings and seeds. Get ready to unlock the secrets of Alocasia propagation and cultivate a thriving jungle of your own.
Whether you’re a seasoned plant parent or a beginner, this comprehensive guide will walk you through every step of the process, from selecting the right tools and materials to providing optimal care for your new Alocasia babies. We’ll cover essential techniques, troubleshoot common issues, and offer expert tips to ensure your success.
Introduction to Alocasia Propagation
Alocasia propagation is a rewarding endeavor for enthusiasts seeking to expand their collection or simply share the beauty of these captivating plants. Propagating Alocasia plants offers numerous advantages, including the ability to create new plants without spending money on purchasing them, the satisfaction of nurturing a new life from a parent plant, and the opportunity to experiment with different propagation techniques.
Methods of Alocasia Propagation
Several methods can be employed to propagate Alocasia plants. The most common methods include:
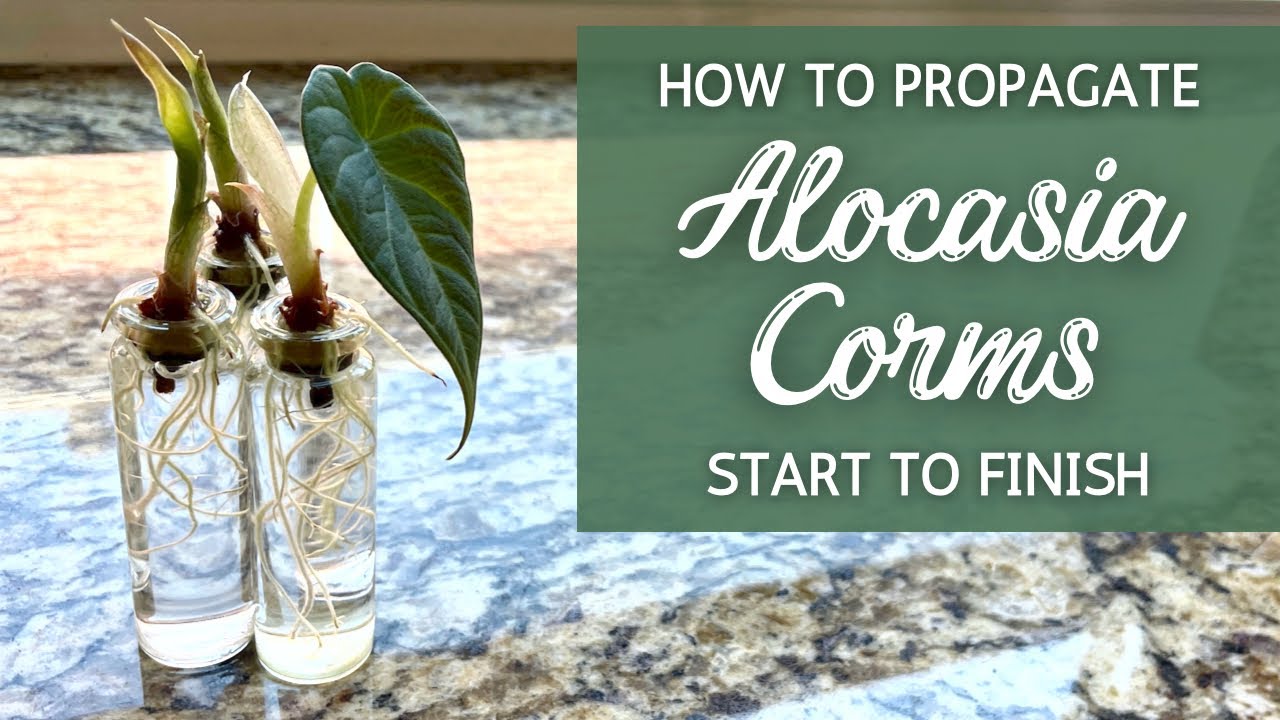
- Division:This technique involves separating the parent plant into multiple divisions, each with its own root system and foliage. This method is ideal for mature plants with multiple growth points.
- Leaf Cuttings:This method utilizes a portion of a mature leaf, typically a petiole (the stalk connecting the leaf to the plant), to produce a new plant. While effective, this method can be more challenging and time-consuming than other methods.
- Seed Propagation:This method involves planting seeds from Alocasia plants. While less common than other methods, seed propagation allows for the creation of new plants with unique genetic variations.
- Tissue Culture:This method utilizes a laboratory setting to propagate Alocasia plants from small tissue samples. Tissue culture is a specialized technique that allows for the rapid and efficient production of new plants.
Alocasia Propagation Methods
Alocasia plants can be propagated using various methods, each with its own advantages and disadvantages. The three most common methods are division, cuttings, and seeds. Choosing the appropriate method depends on factors such as the type of Alocasia, the desired number of plants, and the time and resources available.
Division
Division is the simplest and most effective method for propagating Alocasia. It involves separating the plant into multiple divisions, each with its own roots and foliage. This method is best suited for mature plants that have developed multiple growth points.
- Process:
- Gently remove the Alocasia plant from its pot.
- Carefully separate the plant into divisions, ensuring each division has healthy roots and at least one growth point.
- Repot each division in a suitable pot filled with well-draining potting mix.
- Water the divisions thoroughly and place them in a warm, bright location out of direct sunlight.
Cuttings
Propagating Alocasia from cuttings involves taking a piece of stem with a leaf attached and rooting it to create a new plant. This method is suitable for propagating Alocasia varieties that are difficult to divide or for increasing the number of plants quickly.
Mastering the art of propagation can be a rewarding experience, allowing you to multiply your favorite plants and share their beauty with others. While the process can vary depending on the species, the basic principles remain the same. For instance, if you’re looking to expand your collection of exotic blooms, you might be interested in learning how to propagate Birds of Paradise, as detailed in this comprehensive guide: How To Propagate Birds Of Paradise: Expert Advice for Gorgeous Blooms.
Similarly, when it comes to propagating Alocasia, understanding the optimal conditions for root development and providing the right care will ensure success in cultivating these striking foliage plants.
- Process:
- Select a healthy stem with a leaf attached and use a sharp, sterilized knife or scissors to make a clean cut just below a node (where the leaf joins the stem).
- Dip the cut end of the stem in rooting hormone powder to promote root development.
- Insert the cutting into a pot filled with a well-draining rooting mix, ensuring the node is buried in the mix.
- Water the cutting thoroughly and place it in a warm, humid environment with indirect light.
- Keep the rooting mix consistently moist but not soggy.
- Once roots have developed, usually within a few weeks, you can transplant the cutting into a larger pot with regular potting mix.
Seeds
Propagating Alocasia from seeds is a more time-consuming and less reliable method compared to division or cuttings. However, it allows for the creation of new varieties through cross-pollination.
- Process:
- Collect ripe Alocasia seeds from the seed pods. The seeds are typically small and black.
- Sow the seeds in a seed tray filled with a well-draining seed-starting mix.
- Water the seeds thoroughly and cover the tray with a clear plastic dome or wrap to create a humid environment.
- Place the tray in a warm, bright location with indirect light.
- Maintain the seed-starting mix consistently moist.
- Once the seedlings have developed a few true leaves, they can be transplanted into individual pots.
Alocasia Propagation Methods Comparison
Method |
Advantages |
Disadvantages |
|---|---|---|
Division |
Simple and effective, produces new plants quickly |
Only suitable for mature plants with multiple growth points |
Cuttings |
Suitable for propagating difficult-to-divide varieties, increases plant numbers quickly |
Requires more time and care compared to division |
Seeds |
Allows for creating new varieties, can produce a large number of plants |
Time-consuming, less reliable than other methods, seedlings may not be true to type |
Essential Tools and Materials

A well-equipped arsenal of tools and materials is crucial for successful Alocasia propagation. Having the right tools at your disposal ensures a smooth and efficient propagation process, maximizing the chances of success.
Essential Tools and Materials
A basic set of tools and materials is essential for propagating Alocasia plants. These tools are readily available and can be sourced from local gardening stores or online retailers.
- Sharp knife or pruning shears:A sharp knife or pruning shears are essential for making clean cuts on the Alocasia plant material, minimizing the risk of infections and promoting healthy root development.
- Sterile potting mix:A well-draining, sterile potting mix is crucial for providing the ideal environment for root growth. It should retain moisture while allowing excess water to drain freely, preventing root rot.
- Propagation containers:Propagation containers, such as small pots, trays, or even clear plastic bags, provide a suitable environment for rooting the Alocasia cuttings. They should have drainage holes to prevent waterlogging.
- Rooting hormone (optional):Rooting hormone, a powdered or liquid formulation, can help stimulate root development and increase the success rate of propagation. It contains plant hormones that encourage root growth.
- Water:Water is essential for keeping the potting mix moist, promoting root growth, and maintaining the overall health of the Alocasia cuttings.
- Labels:Labels are helpful for keeping track of the different Alocasia varieties being propagated and for recording the propagation date.
Step-by-Step Propagation Guides
Now that you have gathered the necessary tools and materials, let’s dive into the step-by-step guides for each propagation method. These detailed instructions, along with visual aids, will help you successfully propagate your Alocasia plants.
Leaf Cutting Propagation
Leaf cutting propagation is a simple and effective method for multiplying your Alocasia collection. It involves using a portion of a mature leaf to grow a new plant.
Step |
Description |
Image |
|---|---|---|
1. Prepare the Leaf Cutting |
Select a healthy, mature leaf from your Alocasia plant. Using a sharp, sterilized knife or scissors, cut a section of the leaf blade, ensuring it includes a portion of the petiole (leaf stalk). The cut should be made at a 45-degree angle for optimal root development. |
[Image: A close-up of a sharp knife or scissors cutting a section of a mature Alocasia leaf blade, including a portion of the petiole. The cut is made at a 45-degree angle.] |
2. Prepare the Growing Medium |
Fill a small pot or container with a well-draining propagation mix, such as a blend of peat moss, perlite, and vermiculite. This mix provides the ideal environment for root growth. |
[Image: A small pot or container filled with a well-draining propagation mix. The mix appears light and airy.] |
3. Plant the Leaf Cutting |
Make a small hole in the propagation mix using your finger or a pencil. Gently insert the cut end of the leaf cutting into the hole, ensuring the petiole is buried slightly. |
[Image: A leaf cutting with the cut end inserted into a small hole in the propagation mix. The petiole is buried slightly.] |
4. Water and Cover |
Water the propagation mix thoroughly, ensuring it is evenly moist. Cover the pot with a clear plastic dome or bag to create a humid environment. |
[Image: A pot with the leaf cutting covered with a clear plastic dome or bag.] |
5. Provide Indirect Light |
Place the pot in a location with bright, indirect light. Avoid direct sunlight, which can scorch the delicate leaf cutting. |
[Image: A pot with the leaf cutting placed in a location with bright, indirect light.] |
6. Maintain Humidity and Temperature |
Maintain a warm temperature of around 70-75°F (21-24°C) and high humidity. Mist the leaf cutting regularly to keep the environment moist. |
[Image: A person misting the leaf cutting with a spray bottle.] |
7. Monitor for Root Development |
After a few weeks, check for signs of root development. You should see small, white roots emerging from the base of the petiole. |
[Image: A close-up of the base of the petiole showing small, white roots emerging.] |
8. Transplant to a Larger Pot |
Once the roots have developed sufficiently, carefully transplant the leaf cutting into a larger pot with fresh potting mix. |
[Image: A leaf cutting being carefully transplanted into a larger pot with fresh potting mix.] |
Tuber Division Propagation
Tuber division propagation is a straightforward method that involves separating a mature Alocasia tuber into multiple sections, each containing a growth bud. These sections can then be planted individually to produce new plants.
Step |
Description |
Image |
|---|---|---|
1. Prepare the Tuber |
Gently remove the Alocasia tuber from its pot. Using a sharp, sterilized knife or pruning shears, carefully cut the tuber into multiple sections, ensuring each section contains at least one growth bud. |
[Image: A person carefully cutting a mature Alocasia tuber into multiple sections using a sharp, sterilized knife or pruning shears. Each section contains at least one growth bud.] |
2. Prepare the Pots and Growing Medium |
Fill small pots with a well-draining potting mix, such as a blend of peat moss, perlite, and vermiculite. The mix should be slightly moist. |
[Image: Small pots filled with a well-draining potting mix. The mix appears slightly moist.] |
3. Plant the Tuber Sections |
Place each tuber section in a separate pot, ensuring the growth bud is facing upwards. Cover the tuber sections with the potting mix, leaving the growth bud exposed. |
[Image: A tuber section placed in a small pot with the growth bud facing upwards. The tuber section is covered with potting mix, leaving the growth bud exposed.] |
4. Water and Provide Indirect Light |
Water the pots thoroughly, ensuring the potting mix is evenly moist. Place the pots in a location with bright, indirect light. |
[Image: Small pots with the tuber sections placed in a location with bright, indirect light. The pots are watered thoroughly.] |
5. Monitor for Growth |
Monitor the tuber sections for signs of new growth. You should see small shoots emerging from the growth buds within a few weeks. |
[Image: A close-up of a tuber section with small shoots emerging from the growth bud.] |
Care and Maintenance After Propagation

After successfully propagating your Alocasia, providing the right care and maintenance is crucial for its healthy growth and development. The newly propagated plant needs optimal conditions to establish its root system and thrive.
Mastering the art of propagation opens up a world of possibilities for plant enthusiasts, and Alocasia is no exception. While Alocasia propagation shares similarities with other tropical plants, understanding the nuances of its specific needs is key to success. For those seeking to expand their tropical collection, check out The Essential Guide on How To Propagate Birds Of Paradise for Gorgeous Results for a detailed look at another popular tropical species.
By applying the same principles of patience, proper care, and understanding of the plant’s needs, you’ll be well on your way to enjoying the beauty of your own propagated Alocasia plants.
Watering
Proper watering is essential for successful rooting and growth after propagation. Overwatering can lead to root rot, while underwatering can cause wilting and stunted growth. The goal is to maintain a consistently moist but not soggy environment for the roots.
- Frequency:Water when the top inch of soil feels dry to the touch. Avoid letting the soil completely dry out.
- Water Quality:Use filtered or distilled water to avoid mineral buildup in the soil.
- Drainage:Ensure the pot has drainage holes to prevent waterlogging.
Lighting
Alocasia plants prefer bright, indirect light. Direct sunlight can scorch their leaves, so it’s essential to protect them from harsh rays.
- Ideal Location:Place the propagated plant in a spot that receives bright, indirect light, such as near a window with a sheer curtain.
- Light Intensity:Monitor the leaves for signs of stress, such as wilting or discoloration. If the leaves are drooping, it might indicate too much light. Adjust the location accordingly.
Humidity
Alocasia plants thrive in humid environments.
- Importance:High humidity helps prevent leaf browning and wilting.
- Methods:Use a humidifier, place the pot on a pebble tray filled with water, or group the plant with other humidity-loving plants.
Preventing Root Rot
Root rot is a common problem for Alocasia plants, especially when overwatered.
- Signs:Look for wilting leaves, yellowing foliage, and a foul odor from the soil.
- Prevention:Use well-draining potting mix, water only when the soil is partially dry, and avoid overwatering.
Pests
Alocasia plants are susceptible to common houseplant pests such as aphids, mealybugs, and spider mites.
- Inspection:Regularly inspect the leaves and stems for signs of pests.
- Treatment:If pests are present, use a mild insecticidal soap or neem oil to control them.
Troubleshooting Common Issues
While Alocasia propagation is generally straightforward, certain issues can arise during the process. Understanding these common problems and their solutions can significantly improve your success rate and ensure healthy new plants.
Identifying and Resolving Common Issues
The following table Artikels common issues that may occur during Alocasia propagation, their causes, and recommended solutions:
Issue |
Cause |
Solution |
|---|---|---|
No root growth |
Insufficient humidity, improper cutting technique, unsuitable growing medium, or overly cold temperatures. |
Maintain high humidity levels, use a sharp, sterile blade for cuttings, select a well-draining potting mix, and ensure temperatures are above 65°F (18°C). |
Root rot |
Overwatering, poor drainage, or using a dense, water-retentive potting mix. |
Allow the soil to dry slightly between waterings, ensure proper drainage, and use a well-draining potting mix. |
Leaf wilting or yellowing |
Underwatering, overwatering, insufficient light, or nutrient deficiencies. |
Water consistently, ensuring the soil dries slightly between waterings, provide adequate light, and use a balanced fertilizer for Alocasia. |
Leaf spotting or discoloration |
Fungal or bacterial infections, pests, or environmental stress. |
Treat any fungal or bacterial infections with appropriate fungicides or bactericides. Identify and address any pest infestations. Ensure proper air circulation and avoid overwatering. |
Slow growth |
Insufficient light, nutrient deficiencies, or improper watering. |
Provide bright, indirect light, fertilize regularly with a balanced fertilizer, and water consistently, allowing the soil to dry slightly between waterings. |
Successful Propagation Tips
Propagating Alocasia is generally straightforward, but a few key tips can help you increase your chances of success and ensure healthy, thriving new plants. By following these guidelines and paying close attention to your Alocasia, you can significantly enhance your propagation journey.
Using Clean Tools and Sterile Potting Mix, Master the Propagation Process: How To Propagate Alocasia Perfectly
Cleanliness and sterility are crucial for successful Alocasia propagation. Using contaminated tools can introduce diseases and pests, while using unsterilized potting mix can harbor harmful microorganisms.
- Sterilize tools:Before working with your Alocasia, sterilize all tools, including knives, scissors, and propagation trays, using a solution of 1 part bleach to 9 parts water. Allow the tools to soak for at least 30 minutes, then rinse thoroughly with clean water and dry completely.
- Sterilize potting mix:You can sterilize your potting mix by heating it in the oven at 180°C (355°F) for 30 minutes. Alternatively, you can purchase pre-sterilized potting mix from a reputable garden center.
- Clean workspace:Keep your workspace clean and free of debris. This helps to prevent contamination and ensures a healthy environment for your Alocasia cuttings.
Patience and Observation
Patience and observation are essential for successful propagation. Alocasia can take time to root, and it’s important to monitor their progress closely.
- Observe for signs of rooting:Regularly check your cuttings for signs of new growth, such as callus formation or the emergence of roots. This can take anywhere from a few weeks to a few months, depending on the propagation method and environmental conditions.
- Be patient:Avoid disturbing the cuttings too frequently, as this can hinder root development. Patience and consistent care will allow your Alocasia to establish a strong root system.
- Adjust care as needed:As your Alocasia cuttings develop, you may need to adjust their care, such as providing more humidity or adjusting the amount of light they receive. Close observation will help you identify any changes and respond appropriately.
Ending Remarks: Master The Propagation Process: How To Propagate Alocasia Perfectly
Propagating Alocasia plants opens a world of possibilities for plant lovers. By mastering the techniques Artikeld in this guide, you can expand your collection, share the beauty of Alocasia with friends and family, and experience the joy of nurturing new life.
Remember, patience and a bit of care will lead you to a flourishing Alocasia jungle. So, gather your tools, choose your preferred propagation method, and embark on your Alocasia propagation journey. Happy growing!
Frequently Asked Questions
What is the best time to propagate Alocasia?
The best time to propagate Alocasia is during the spring or summer when the plant is actively growing.
How long does it take for Alocasia cuttings to root?
It can take anywhere from a few weeks to a few months for Alocasia cuttings to root, depending on the method used and the environmental conditions.
Can I propagate Alocasia from leaves?
While it’s possible to propagate Alocasia from leaves, it’s generally more successful with stem cuttings or division.
